

Step-by-Step Sanity Guide: Adding Code Blocks to Your Sanity + Next.js Blog
Part 1: Step-by-Step Sanity Guide: Setting Up Sanity.io with Next.js
Part 2: Step-by-Step Sanity Guide: Adding Code Blocks to Your Sanity + Next.js Blog
Introduction
Code blocks are essential for any technical blog. They allow you to share code snippets, configuration files, and terminal commands in a clean, readable format. In this guide, we'll walk through implementing beautiful, syntax-highlighted code blocks in your Sanity + Next.js blog.
What You'll Build
By the end of this tutorial, you'll have:
- A custom code block schema in Sanity Studio
- Syntax-highlighted code blocks on your frontend
- Copy-to-clipboard functionality
- Language-specific styling
Prerequisites
Before we start, make sure you have:
- A working Sanity.io + Next.js blog setup. (Click here to see how to make one)
- Basic knowledge of Next.js and Sanity.io schemas
Step 1: Create the Code Block Schema in Sanity
First, let's define a custom schema for code blocks in your Sanity Studio.
Create a new file src/sanity/schemaTypes/codeBlockType.tsx
1import { CodeIcon } from "@sanity/icons";
2import { defineType } from "sanity";
3
4export const codeBlockType = defineType({
5  name: "codeBlock",
6  type: "object",
7  title: "Code Block",
8  icon: CodeIcon,
9  fields: [
10    {
11      name: "language",
12      type: "string",
13      title: "Language",
14      options: {
15        list: [
16          { title: "JavaScript", value: "javascript" },
17          { title: "TypeScript", value: "typescript" },
18          { title: "HTML", value: "html" },
19          { title: "CSS", value: "css" },
20          { title: "Python", value: "python" },
21          { title: "Java", value: "java" },
22          { title: "PHP", value: "php" },
23          { title: "Ruby", value: "ruby" },
24          { title: "C#", value: "csharp" },
25          { title: "C++", value: "cpp" },
26          { title: "Shell", value: "shell" },
27          { title: "SQL", value: "sql" },
28          { title: "JSON", value: "json" },
29          { title: "Plain Text", value: "text" },
30        ],
31      },
32      initialValue: "javascript",
33    },
34    {
35      name: "filename",
36      type: "string",
37      title: "File Name",
38      description: "Optional file name to display",
39    },
40    {
41      name: "code",
42      type: "text",
43      title: "Code",
44      rows: 10,
45    },
46  ],
47  preview: {
48    select: {
49      language: "language",
50      filename: "filename",
51      code: "code",
52    },
53    prepare({ language, filename, code }) {
54      const title = filename
55        ? `${filename} (${language})`
56        : `Code block (${language})`;
57      const firstLine = code?.split("\n")[0];
58      return {
59        title: title,
60        subtitle: firstLine,
61      };
62    },
63  },
64});
65
Step 2: Update Your Blog Post Schema
Next, add the code block to your blog post schema. Update your src/sanity/schemaTypes/blockContentType.ts file:
1import { defineType, defineArrayMember } from "sanity";
2import { ImageIcon } from "@sanity/icons";
3
4/**
5 * This is the schema type for block content used in the post document type
6 * Importing this type into the studio configuration's `schema` property
7 * lets you reuse it in other document types with:
8 *  {
9 *    name: 'someName',
10 *    title: 'Some title',
11 *    type: 'blockContent'
12 *  }
13 */
14
15export const blockContentType = defineType({
16  title: "Block Content",
17  name: "blockContent",
18  type: "array",
19  of: [
20    defineArrayMember({
21      type: "block",
22      // Styles let you define what blocks can be marked up as. The default
23      // set corresponds with HTML tags, but you can set any title or value
24      // you want, and decide how you want to deal with it where you want to
25      // use your content.
26      styles: [
27        { title: "Normal", value: "normal" },
28        { title: "H1", value: "h1" },
29        { title: "H2", value: "h2" },
30        { title: "H3", value: "h3" },
31        { title: "H4", value: "h4" },
32        { title: "Quote", value: "blockquote" },
33      ],
34      lists: [{ title: "Bullet", value: "bullet" }],
35      // Marks let you mark up inline text in the Portable Text Editor
36      marks: {
37        // Decorators usually describe a single property – e.g. a typographic
38        // preference or highlighting
39        decorators: [
40          { title: "Strong", value: "strong" },
41          { title: "Emphasis", value: "em" },
42        ],
43        // Annotations can be any object structure – e.g. a link or a footnote.
44        annotations: [
45          {
46            title: "URL",
47            name: "link",
48            type: "object",
49            fields: [
50              {
51                title: "URL",
52                name: "href",
53                type: "url",
54              },
55            ],
56          },
57        ],
58      },
59    }),
60    // You can add additional types here. Note that you can't use
61    // primitive types such as 'string' and 'number' in the same array
62    // as a block type.
63    defineArrayMember({
64      type: "image",
65      icon: ImageIcon,
66      options: { hotspot: true },
67      fields: [
68        {
69          name: "alt",
70          type: "string",
71          title: "Alternative Text",
72        },
73      ],
74    }),
75    defineArrayMember({
76      type: "codeBlock",
77    }),
78  ],
79});
80
Step 3: Register the Schema
Don't forget to register your new schema in the src/sanity/schemaTypes/index.ts file:
1import { type SchemaTypeDefinition } from "sanity";
2
3import { blockContentType } from "./blockContentType";
4import { categoryType } from "./categoryType";
5import { postType } from "./postType";
6import { authorType } from "./authorType";
7import { codeBlockType } from "./codeBlockType";
8
9export const schema: { types: SchemaTypeDefinition[] } = {
10  types: [blockContentType, categoryType, postType, authorType, codeBlockType],
11};
Step 4: Add Code Block to Your Blog Body
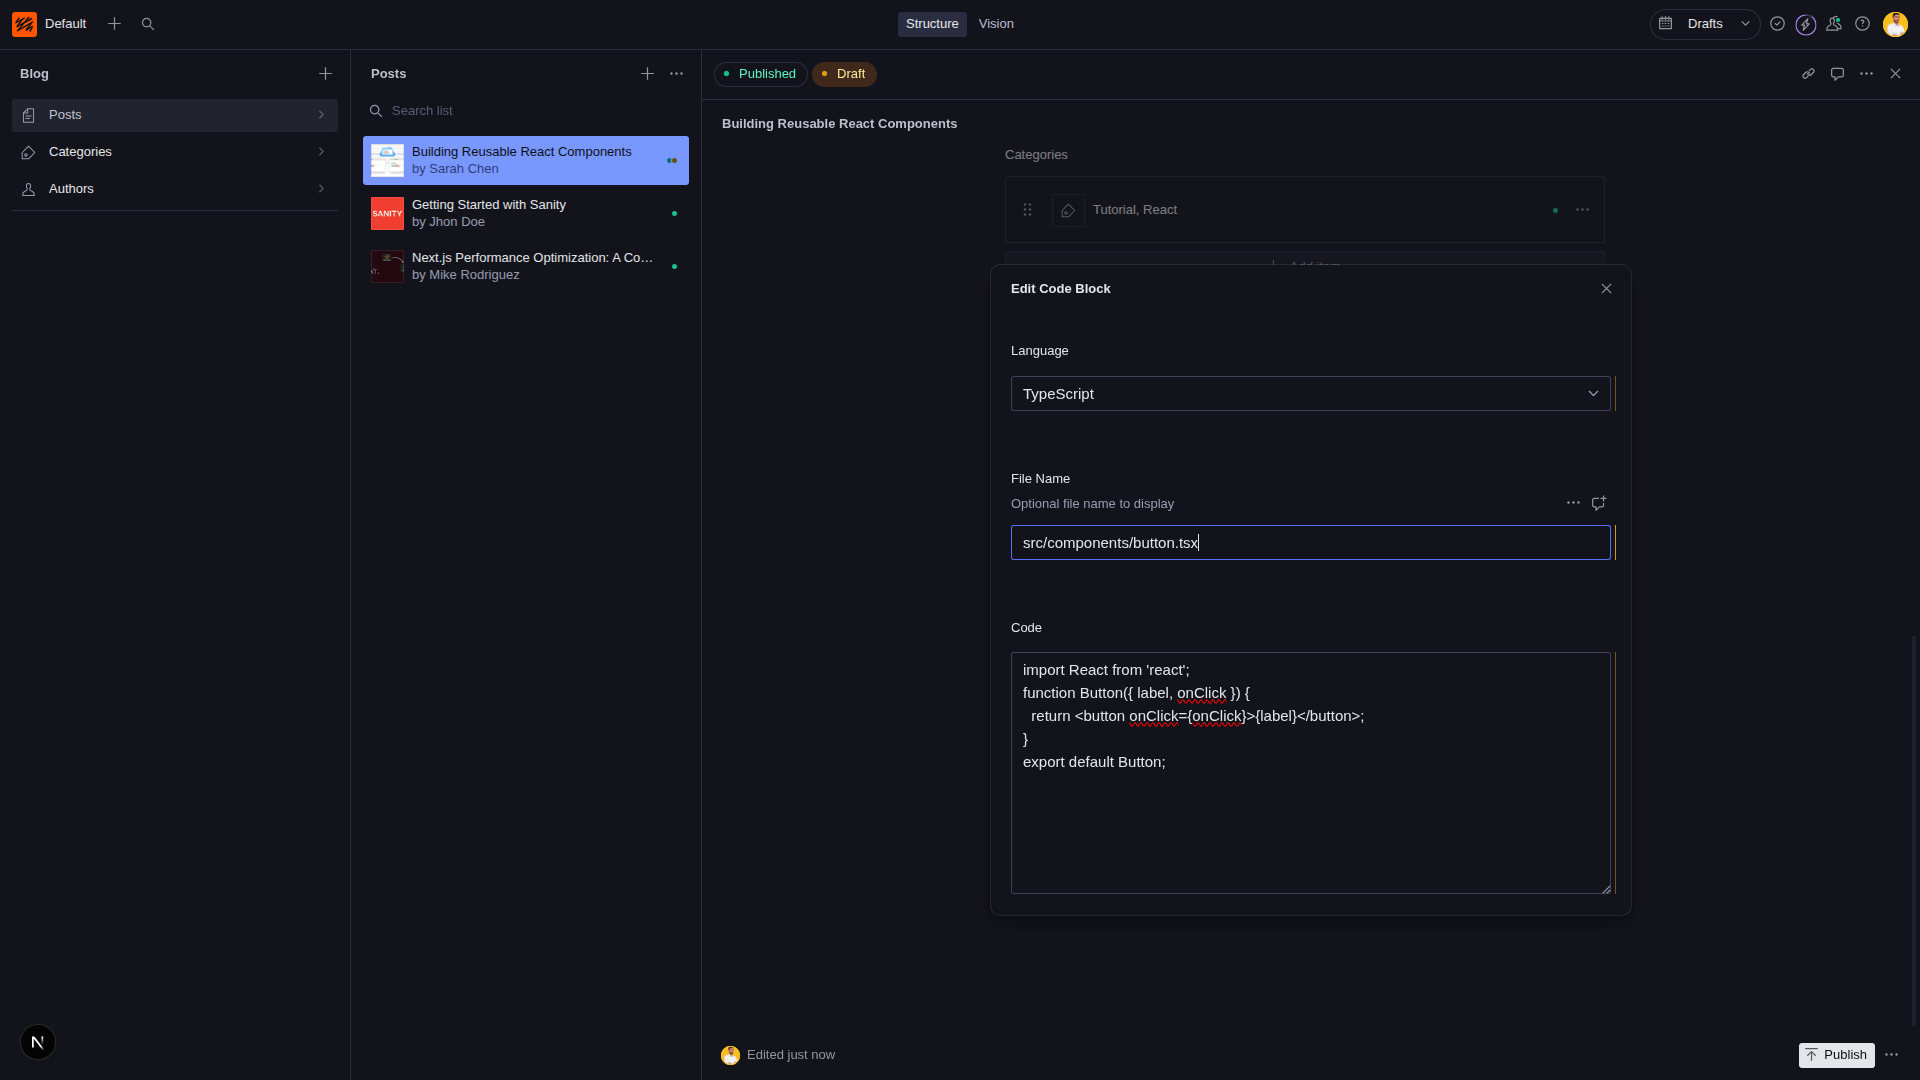
Add a code block in Sanity Studio:
- Open your Studio at http://localhost:3000/studio
- Select a post
- In the body section, click the Code block button (</>)
- Fill in the required inputs (language, code, and file name)
Step 5: Install Frontend Dependencies
Now let's set up the frontend. Install the necessary packages:
1npm i react-syntax-highlighter @types/react-syntax-highlighterStep 6: Define the CodeBlock Type:
Start by adding a new type by creating the src/types/codeBlock.ts file
1export type CodeBlockType = {
2  language: string;
3  code: string;
4  filename: string;
5};
6
Step 7: Implement the CodeBlock Component:
Create a new component src/components/CodeBlock.tsx
1"use client";
2import { useState } from "react";
3import { Prism as SyntaxHighlighter } from "react-syntax-highlighter";
4import { vscDarkPlus } from "react-syntax-highlighter/dist/cjs/styles/prism";
5import { ClipboardIcon, CheckmarkIcon } from "@sanity/icons";
6import { CodeBlockType } from "@/types/codeBlock";
7
8type CodeBlockProps = CodeBlockType;
9export default function CodeBlock({
10  language = "text",
11  code,
12  filename,
13}: CodeBlockProps) {
14  const [copied, setCopied] = useState(false);
15
16  const copyToClipboard = async () => {
17    try {
18      await navigator.clipboard.writeText(code);
19      setCopied(true);
20      setTimeout(() => setCopied(false), 2000);
21    } catch (err) {
22      console.error("Failed to copy code: ", err);
23    }
24  };
25
26  return (
27    <div className="my-6 overflow-hidden rounded-lg border border-gray-200 dark:border-gray-700">
28      {/* Header */}
29      <div className="flex items-center justify-between bg-gray-50 dark:bg-gray-800 px-4 py-2">
30        <div className="flex items-center space-x-2">
31          {filename && (
32            <span className="text-sm text-gray-600 dark:text-gray-300 font-mono">
33              {filename}
34            </span>
35          )}
36        </div>
37
38        <button
39          onClick={copyToClipboard}
40          className="flex items-center space-x-1 text-sm text-gray-600 dark:text-gray-300 hover:text-gray-800 dark:hover:text-gray-100 transition-colors"
41          title="Copy to clipboard"
42        >
43          {copied ? (
44            <CheckmarkIcon className="h-4 w-4 text-green-500" />
45          ) : (
46            <ClipboardIcon className="h-4 w-4" />
47          )}
48          <span>{copied ? "Copied!" : "Copy"}</span>
49        </button>
50      </div>
51
52      {/* Code */}
53      <div className="relative">
54        <SyntaxHighlighter
55          language={language}
56          style={vscDarkPlus}
57          customStyle={{
58            margin: 0,
59            borderRadius: 0,
60            fontSize: "14px",
61            lineHeight: "1.5",
62          }}
63          wrapLines
64          showLineNumbers
65          lineNumberStyle={{
66            minWidth: "3em",
67            paddingRight: "1em",
68            color: "#6b7280",
69            borderRight: "1px solid #374151",
70            marginRight: "1em",
71          }}
72        >
73          {code}
74        </SyntaxHighlighter>
75      </div>
76    </div>
77  );
78}
79
Step 8: Update Your Portable Text Renderer:
Update the ProtableText component props in the src/components/blog.tsx file
1import { PostType } from "@/types/post";
2import { PortableText } from "next-sanity";
3import Image from "next/image";
4import React from "react";
5import CodeBlock from "./codeBlock";
6import { CodeBlockType } from "@/types/codeBlock";
7
8type CodeBlockProps = {
9  value: CodeBlockType;
10};
11
12type BlogProps = {
13  post: PostType;
14};
15
16export const Blog = ({
17  post: {
18    title,
19    author,
20    mainImage: { url, alt },
21    body,
22  },
23}: BlogProps) => {
24  return (
25    <article className="flex flex-col gap-4">
26      <h1 className="text-center text-4xl font-bold text-yellow-300">
27        {title}
28      </h1>
29      <span className="self-end capitalize font-semibold">
30        made by: <span className="text-orange-300">{author}</span>
31      </span>
32      <div className="relative aspect-[3/1.75]">
33        <Image
34          className="object-cover rounded-3xl"
35          src={url}
36          alt={alt}
37          priority
38          fill
39        />
40      </div>
41      <PortableText
42        value={body}
43        components={{
44          block: {
45            normal: ({ children }) => (
46              <p className="leading-7 sm:text-lg">{children}</p>
47            ),
48            h3: ({ children }) => (
49              <h2 className="text-pink-300 font-semibold tracking-tight text-xl sm:text-3xl">
50                {children}
51              </h2>
52            ),
53          },
54          list: {
55            bullet: ({ children }) => (
56              <ul className="sm:text-lg list-disc ml-6">{children}</ul>
57            ),
58          },
59          listItem: {
60            bullet: ({ children }) => (
61              <li className="marker:font-bold">{children}</li>
62            ),
63          },
64          types: {
65            codeBlock: ({
66              value: { language, code, filename },
67            }: CodeBlockProps) => (
68              <CodeBlock language={language} code={code} filename={filename} />
69            ),
70          },
71        }}
72      />
73    </article>
74  );
75};
76
Step 9: Observe and Test the Results:
Run your Next.js project and check if the code block is rendered successfully
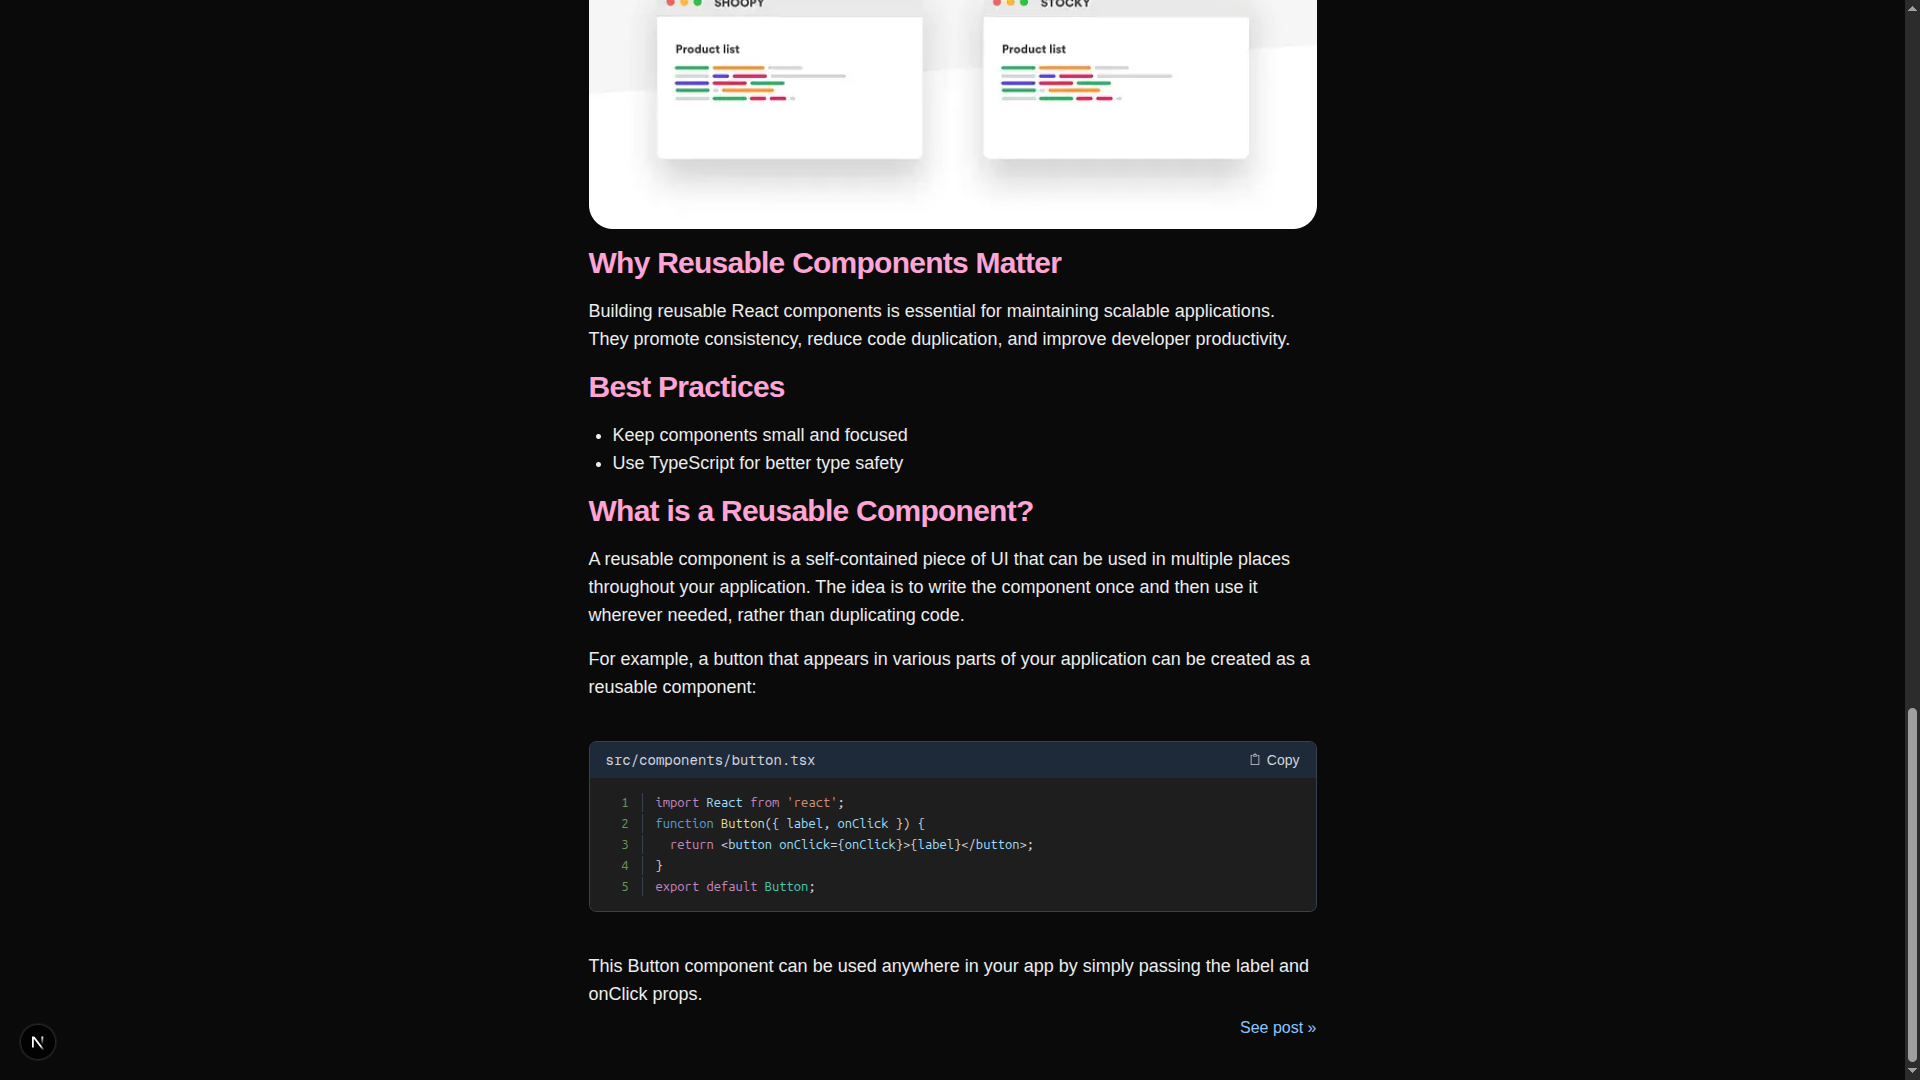
Make sure the copy to clipboard functionality works
Conclusion
You now have a fully functional code block system in your Sanity + Next.js blog! Your readers can enjoy syntax-highlighted code with copy functionality, and you can easily manage code snippets through Sanity Studio.
What You've Built
- Advanced Sanity schema for code blocks with line numbering and Premium syntax highlighting.
- Smart copy-to-clipboard with format preservation and success notifications.
The tutorial is designed to be beginner-friendly while including advanced features that make your code blocks professional and user-friendly. Each step includes complete code examples and explanations of what's happening.
Happy coding! 🚀
Part 1: Step-by-Step Sanity Guide: Setting Up Sanity.io with Next.js
Part 2: Step-by-Step Sanity Guide: Adding Code Blocks to Your Sanity + Next.js Blog