
Build a Bicycle tap Game in React Native Part 6: Game Menu
Previous: Build a Bicycle tap Game in React Native Part 5: Game Logic
This section focuses on building the game menu as the final layer of the experience, turning the project into a complete, playable game. It explains how to create a lightweight, visually consistent entry screen that does not start the simulation prematurely, while cleanly transitioning into level selection and gameplay using Expo Router and declarative navigation. The approach keeps UI concerns separate from the game engine, ensures fast startup with no unnecessary UI-thread work, and establishes a scalable structure with a start menu, dynamic level configuration, and safe navigation controls that feel like a real game rather than a prototype.
Config
To support a clean game menu and future navigation (levels, settings, pause screens), we use Expo Router with a minimal configuration. Expo Router enables file-based routing, which fits very naturally with a game structure: each screen is just a file, and navigation remains declarative and predictable.
Start by installing Expo Router:
1npx expo install expo-routerThen update package.json so Expo Router becomes the application entry point:
1{
2  "main": "expo-router/entry"
3   // other configs
4}
You can now remove the index.ts in the root folder as we no longer need it.
Next, enable the router plugin in app.json. This allows Expo to properly configure native navigation during build time:
1{
2  "scheme": "bicyclegame",
3  "plugins": [
4    "expo-router"
5    // other plugins
6  ]
7  // other configs
8}
Finally, run a prebuild to generate the native iOS and Android projects. This step is especially important in game projects, where native dependencies (Reanimated, Lottie, SVG) need to be correctly linked:
1npx expo prebuildAfter this, your project is ready to support the game menu and seamless navigation into gameplay screens.
Home Screen
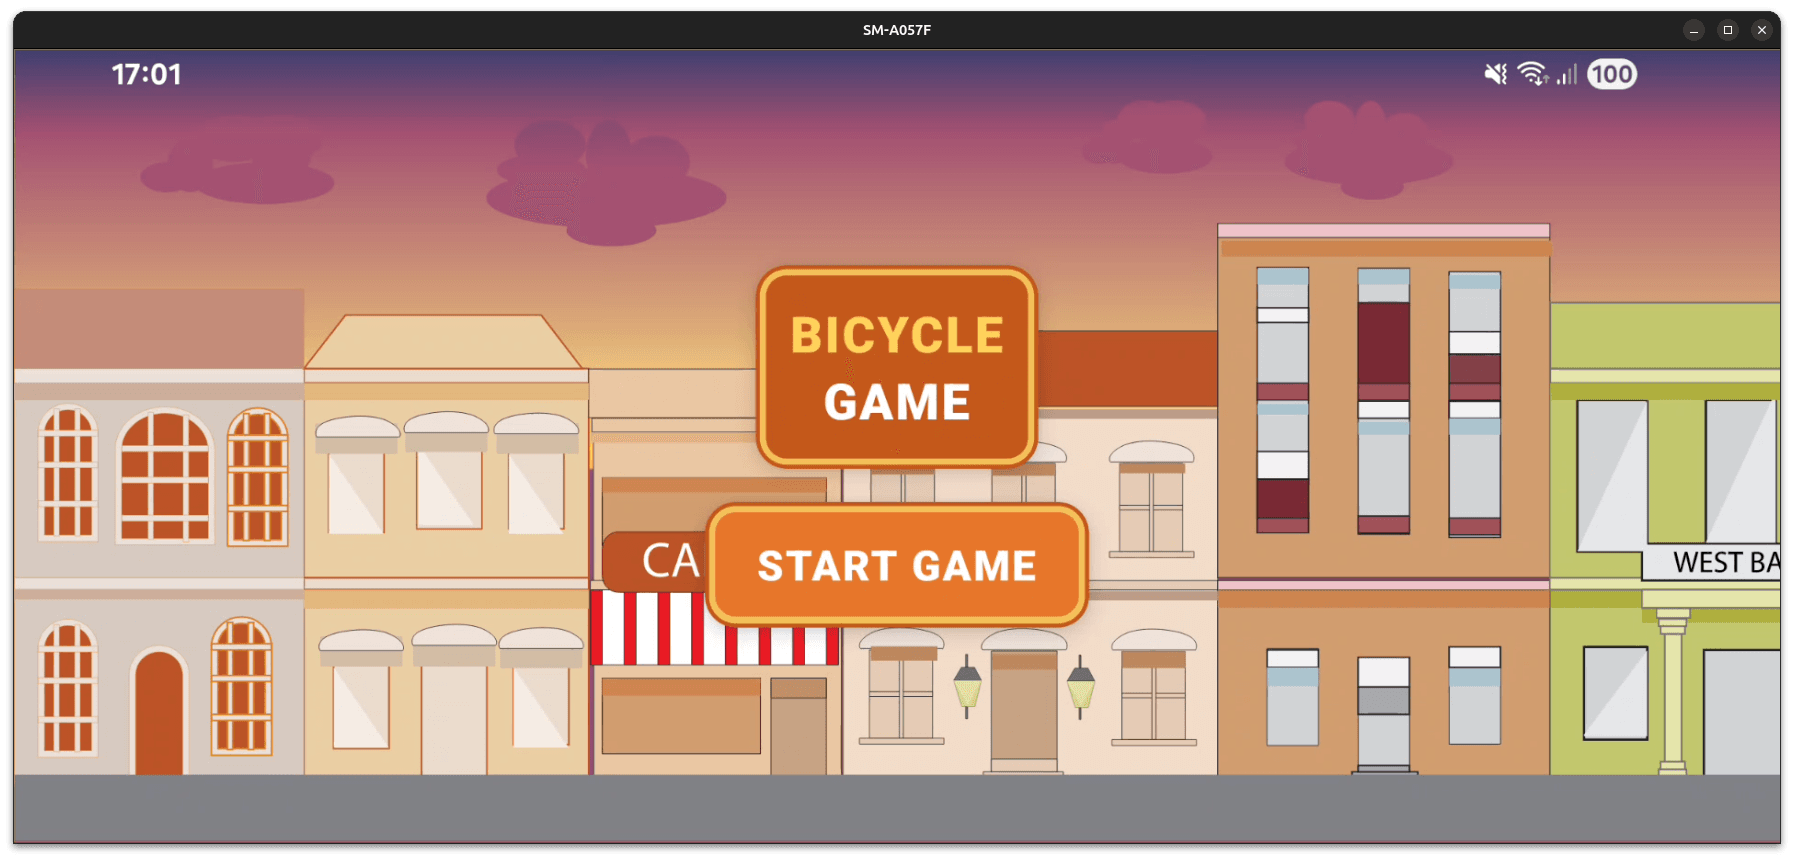
Now we’ll build the home screen of the game: a simple start menu that reuses your SVG background, displays a bold title card, and offers a START GAME button that navigates to /levels.
To keep sizing consistent across devices, we’ll compute the background width from the device height using a constant aspect ratio.
Constants:
Move the BACKGROUND_ASPECT_RATIO from App.tsx and make it a global variable:
1export const BACKGROUND_ASPECT_RATIO = 665 / 241;Menu Button:
Create a reusable button component. It wraps an Expo Router Link, so navigation stays declarative (no imperative router.push needed). The outer container provides the border/shadow, and the inner view provides the main fill color.
1import { Link, LinkProps } from "expo-router";
2import { Text, View } from "react-native";
3
4type MenuButtonProps = {
5  label: string;
6  href: LinkProps["href"];
7  width: number;
8  height: number;
9};
10
11export default function MenuButton({
12  label,
13  href,
14  width,
15  height,
16}: MenuButtonProps) {
17  return (
18    <Link
19      href={href}
20      style={{
21        borderRadius: 15,
22        padding: 3,
23        backgroundColor: "#F2C15A",
24        shadowColor: "#000",
25        shadowOpacity: 0.25,
26        shadowRadius: 8,
27        shadowOffset: { width: 0, height: 6 },
28        elevation: 6,
29        borderColor: "#C4571B",
30        borderWidth: 2,
31      }}
32    >
33      <View
34        style={{
35          borderRadius: 10,
36          backgroundColor: "#E7772A",
37          alignItems: "center",
38          justifyContent: "center",
39          width,
40          height,
41        }}
42      >
43        <Text
44          style={{
45            color: "#FFF",
46            fontSize: 20,
47            fontWeight: "900",
48            letterSpacing: 1,
49          }}
50        >
51          {label}
52        </Text>
53      </View>
54    </Link>
55  );
56}
landing component
This is the menu screen itself. We:
- Read the window height
- Scale the background SVG to full height
- Compute its width using BACKGROUND_ASPECT_RATIO
- Render the background absolutely behind the UI
- Show the title card + the start button
1import { Dimensions, Text, View } from "react-native";
2import Background from "../assets/Background";
3import MenuButton from "../components/menu-button";
4import { BACKGROUND_ASPECT_RATIO } from "../consts";
5
6export default function Game() {
7  const { height } = Dimensions.get("window");
8  const backgroundHeight = height;
9  const backgroundWidth = height * BACKGROUND_ASPECT_RATIO;
10
11  return (
12    <View
13      style={{
14        flex: 1,
15        alignItems: "center",
16        justifyContent: "center",
17        gap: 16,
18      }}
19    >
20      <Background
21        style={{ position: "absolute", left: 0 }}
22        width={backgroundWidth}
23        height={backgroundHeight}
24      />
25
26      {/* Title */}
27      <View
28        style={{
29          borderRadius: 15,
30          padding: 3,
31          backgroundColor: "#F2C15A",
32          shadowColor: "#000",
33          shadowOpacity: 0.25,
34          shadowRadius: 8,
35          shadowOffset: { width: 0, height: 6 },
36          elevation: 6,
37          borderColor: "#C4571B",
38          borderWidth: 2,
39        }}
40      >
41        <View
42          style={{
43            borderRadius: 10,
44            backgroundColor: "#C4571B",
45            alignItems: "center",
46            justifyContent: "center",
47            padding: 12,
48          }}
49        >
50          <Text
51            style={{
52              color: "#FFD35A",
53              fontSize: 24,
54              fontWeight: "900",
55              letterSpacing: 1,
56            }}
57          >
58            BICYCLE
59          </Text>
60          <Text
61            style={{
62              color: "#FFF",
63              fontSize: 24,
64              fontWeight: "900",
65              letterSpacing: 1,
66            }}
67          >
68            GAME
69          </Text>
70        </View>
71      </View>
72
73      {/* CTA */}
74      <MenuButton href="/levels" label="START GAME" width={175} height={50} />
75    </View>
76  );
77}
That’s it: you now have a clean start menu that looks like a real game UI, reuses your background asset, and navigates to the next route via Expo Router.
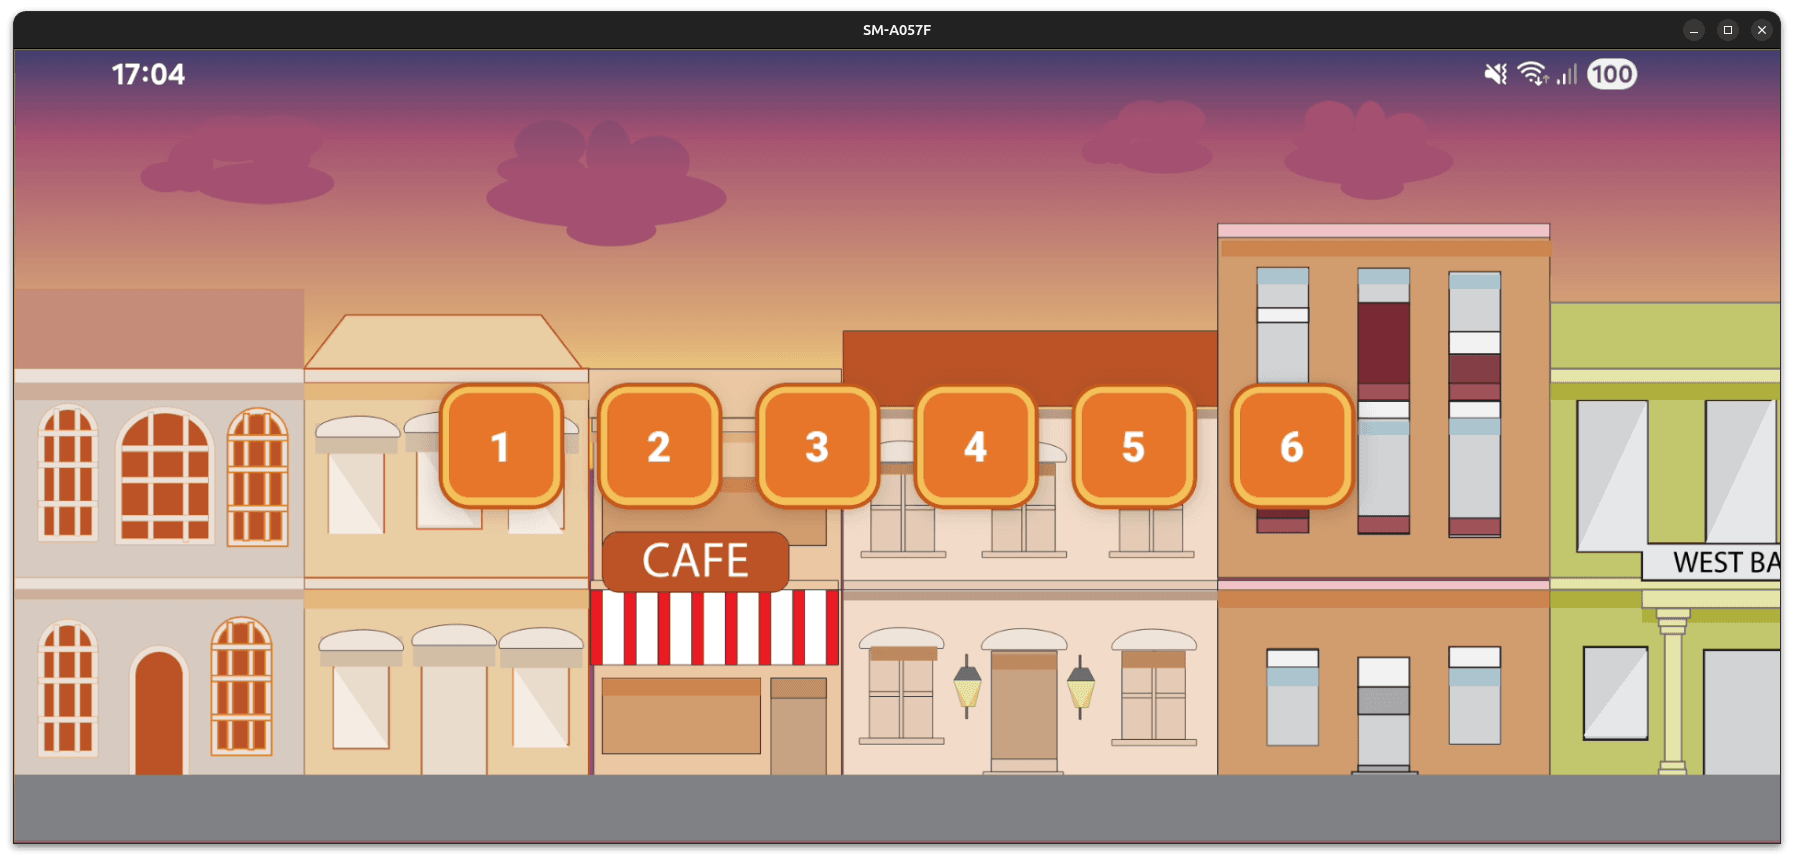
Level Select Screen
Now that the menu can route to /levels, we’ll build a Level Select screen that renders a set of level buttons from a simple config array. Each button navigates to a dynamic route (/levels/[id]) and passes the level parameters (nbBackgrounds, monsterSpeed) through the URL params perfect for keeping the game logic configurable without hardcoding values in the screen.
types:
Define a small type for your level configuration. These values are strings because they are passed as route params:
1export type LevelConfigType = {
2  id: string;
3  nbBackgrounds: string;
4  monsterSpeed: string;
5};
levels as data:
Create a level list. This becomes your single source of truth for available levels and difficulty tuning:
1import { LevelConfigType } from "./types";
2
3export const levels: LevelConfigType[] = [
4  { id: "1", nbBackgrounds: "2", monsterSpeed: "1" },
5  { id: "2", nbBackgrounds: "3", monsterSpeed: "1" },
6  { id: "3", nbBackgrounds: "2", monsterSpeed: "1.25" },
7  { id: "4", nbBackgrounds: "3", monsterSpeed: "1.25" },
8  { id: "5", nbBackgrounds: "2", monsterSpeed: "1.5" },
9  { id: "6", nbBackgrounds: "3", monsterSpeed: "1.5" },
10];
levels component:
This screen:
- Reuses the same background sizing logic (consistent visuals)
- Maps over levels to render one MenuButton per level
- Uses Expo Router dynamic routing (/levels/[id])
- Passes parameters via params so the game screen can read them with useLocalSearchParams()
1import { Dimensions, View } from "react-native";
2import Background from "../../assets/Background";
3import MenuButton from "../../components/menu-button";
4import { BACKGROUND_ASPECT_RATIO } from "../../consts";
5import { levels } from "../../data";
6
7export default function Levels() {
8  const { height } = Dimensions.get("window");
9  const backgroundHeight = height;
10  const backgroundWidth = height * BACKGROUND_ASPECT_RATIO;
11
12  return (
13    <View
14      style={{
15        flex: 1,
16        flexDirection: "row",
17        alignItems: "center",
18        justifyContent: "center",
19        gap: 16,
20      }}
21    >
22      <Background
23        style={{ position: "absolute", left: 0 }}
24        width={backgroundWidth}
25        height={backgroundHeight}
26      />
27
28      {levels.map(({ id, nbBackgrounds, monsterSpeed }) => (
29        <MenuButton
30          key={id}
31          href={{
32            pathname: "/levels/[id]",
33            params: { id, nbBackgrounds, monsterSpeed },
34          }}
35          label={id}
36          width={50}
37          height={50}
38        />
39      ))}
40    </View>
41  );
42}
Result: You now have a fully functional Level Select screen driven by data. Adding a new level becomes as simple as adding a new entry to levels[], and the correct params will automatically be passed to the gameplay route.
Dynamic Level Screen
Until now, the game lived in a single App.tsx with hardcoded difficulty (2 backgrounds, same monster speed). In this part, we convert it into a dynamic route so each level can customize the world size and monster speed through Expo Router params.
The goal is simple:
- Move the old App.tsx game into a route screen
- Read nbBackgrounds and monsterSpeed from the URL
- Generate the world (backgrounds + width) dynamically
- Keep the same game logic (tap to accelerate, chase, win/lose/pause)
- Add a Home button
Step 1: Move the old game logic into a route screen
Create a dynamic route file and paste your old game code into it:
- From: App.tsx
- To: app/levels/[id].tsx
This turns the game into a screen that can be opened from the Level Select buttons. - You can now remove the App.tsx file as we no longer need it.
Step 2: Read the number of backgrounds and the monster speed from the URL
Use Expo Router params inside the level screen:
- Import: useLocalSearchParams
- Read params and convert to numbers:
1const params = useLocalSearchParams<LevelConfigType>();
2const nbBackgrounds = Number(params.nbBackgrounds);
3const monsterSpeed = Number(params.monsterSpeed);
Now every level can inject its own world size + difficulty.
Step 3: Generate the world dynamically (backgrounds + width)
Replace the fixed world logic (* 2) with param-driven logic:
1const worldWidth = backgroundWidth * nbBackgrounds;Then render the backgrounds using a loop instead of duplicating components manually:
1{Array.from({ length: nbBackgrounds }).map((_, index) => (
2  <Background key={index} width={backgroundWidth} height={backgroundHeight} />
3))}
Step 4: Keep the same game logic (tap, chase, pause, win/lose)
Do not change your core mechanics. Only update what depends on level params:
- The win line still uses worldWidth
- The monster movement uses monsterSpeed
1monsterPosition.value += monsterSpeed;
2characterPosition.value += characterSpeed.value;
Step 5: Add a Home button for pause/win/lose overlays
Replace replayStyle definition:
Originally, replayStyle was used to show or hide the Replay button. As the UI evolved (Replay + Home + future actions), the name no longer reflected what the style actually does. A better, more accurate name is notReadyStyle:
1const notReadyStyle = useAnimatedStyle(() => ({
2  display: gameState.value === "READY" ? "none" : "flex",
3}));
The logic stays exactly the same, only the intent becomes clearer.
Add home button:
Place the Home button next to Replay inside the overlay:
1<View style={{ gap: 16, flexDirection: "row" }}>
2  <Animated.View style={pauseStyle}>
3    <FontAwesome5
4      name="play"
5      size={40}
6      color="yellow"
7      onPress={resumeGame}
8    />
9  </Animated.View>
10
11  <Animated.View style={notReadyStyle}>
12    <MaterialIcons
13      name="replay"
14      size={40}
15      color="yellow"
16      onPress={restartGame}
17    />
18  </Animated.View>
19
20  <Animated.View style={notReadyStyle}>
21    <Link href="/">
22      <MaterialIcons name="home" size={40} color="yellow" />
23    </Link>
24  </Animated.View>
25</View>
Why this works well:
- State-driven visibility: hidden in READY, visible everywhere else
- No imperative navigation: Expo Router Link keeps it declarative
- Safe exit: avoids weird states when leaving mid-game
- Scales easily: add Settings / Next Level using the same pattern
Navigation Menu
On Android, the hardware back button is part of the gameplay UX. Instead of instantly leaving the level, we can use it to toggle pause/resume, and only exit to the home menu when the game is not actively running.
Add this logic inside your level screen with useFocusEffect:
1useFocusEffect(() => {
2  const onBackPress = () => {
3    // If the game is running, back button pauses the game
4    if (gameState.value === "RUNNING") {
5      pauseGame();
6      return true;
7    }
8
9    // If the game is paused, back button resumes the game
10    if (gameState.value === "PAUSED") {
11      resumeGame();
12      return true;
13    }
14
15    // Otherwise (READY, WON, OVER), go back to home
16    router.navigate("/");
17    return true;
18  };
19
20  const backHandler = BackHandler.addEventListener(
21    "hardwareBackPress",
22    onBackPress,
23  );
24
25  return () => backHandler.remove();
26});
Behavior summary:
- RUNNING → Back pauses
- PAUSED → Back resumes
- READY / WON / OVER → Back navigates to Home Screen
This gives you a console-like feel and prevents accidental exits mid-run.
Next: Build a Bicycle tap Game in React Native Part 7: Web Port